I'm just starting out, guide me

Two paths,
and nothing you need to know beforehand.

This manual starts from zero: it assumes nothing about what you know, neither about bitcoin nor about VPNs, and never uses a technical term without explaining it. Whichever path you choose, you will come out of it with two things: a bitcoin wallet that is yours, which we teach you to open step by step, and a stealth VPN for the price of a coffee a month. The full path adds the Bitcoin node: that is the one to take if you intend to keep your bitcoins rather than spend them straight away.

Two paths of glass tiles branch off from a single tile: one short and amber, the other long and violet

Nothing to prepare: a phone and/or a computer, a confidential email address, and enough to buy a few dozen euros' worth of bitcoin. You can stop at any step and pick up again later. Both paths share the same stealth VPN: NODECOVE adds your Bitcoin node to it.

Short path · COVE

Before, without a VPN, you left traces.
Today, with AI, you leave a dossier.

The day you get turned down for something, a loan, an insurance policy, a job, a visa, it will be an AI that read that dossier. It will not need proof, just a cluster of traces, and no one will tell you which ones. COVE, our stealth VPN, stops producing them: your internet provider no longer sees which sites you open, the sites no longer see who is visiting, and we write no connection log. We cannot hand over what we never wrote down. The price of a coffee a month, paid with no name and no card.

Nine steps here: the amount to plan, your first bitcoin, a wallet on your phone, the transfer, the order and payment, your city, the delivery email, your first device, and your account. Count on an evening the first time, the time it takes to open your wallet and for the network to confirm your payment; a quarter of an hour the times after that. Each step says what you need to touch on your phone and/or your computer, and why. The links to the detailed guides open in another tab or another page on your phone, so you never lose your place here. If you ever want the Bitcoin node as well, the time you have already paid for is added to NODECOVE's, you lose nothing.

Five glass panels lined up, amber then violet, lead to a ring of light
C1

Choose your COVE plan: the guide works out what to buy

You buy the bitcoin before you order, so first decide how long you want COVE for. The guide then gives you the amount to buy, with a margin.

Buy about €90 of bitcoin.

The margin covers the withdrawal fee, the network fee and the price moving between your purchase and your payment. Whatever is left stays yours, in Blue Wallet.

C2

If you don't have any bitcoin: buy it on Revolut

The simplest way, by far, is a Revolut account: a free online bank, licensed in Europe. Install the app and have your identity verified: count on twenty minutes, sometimes a few hours. Put euros on the account, open Crypto, choose Bitcoin, and buy the amount shown in the previous step.

Don't leave your bitcoin there. As long as it stays at Revolut, you don't hold its keys. The next two steps move it into your own wallet, Blue Wallet, and that's where you pay from.

Revolut isn't available in your country? Our dedicated page gives an app for each region of the world. Wherever this guide says Revolut, read the name of your app.

C3

Install Blue Wallet and create your wallet

Blue Wallet is free and works on iPhone and Android. Install it, put it in your language as shown below, then create your wallet.

First: put Blue Wallet in your language

Blue Wallet often opens in English, even on a phone set to another language. Changing it takes thirty seconds.

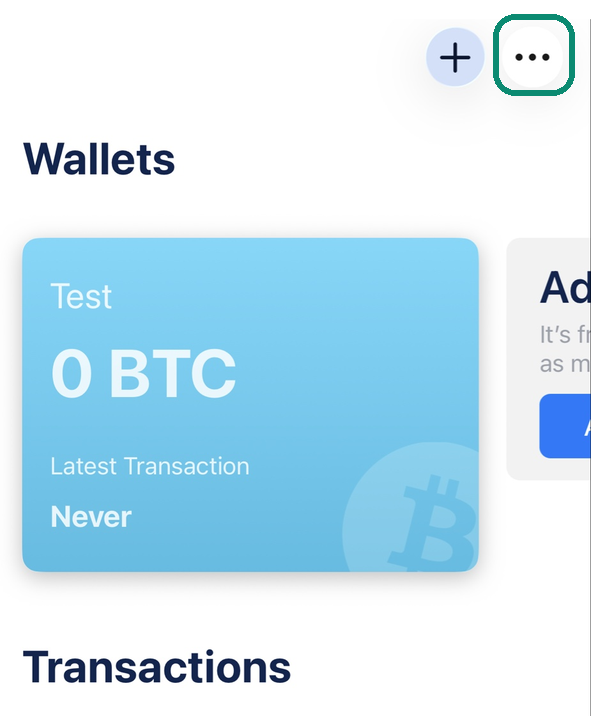
  1. On the Blue Wallet home screen, tap the three dots … at the top right.
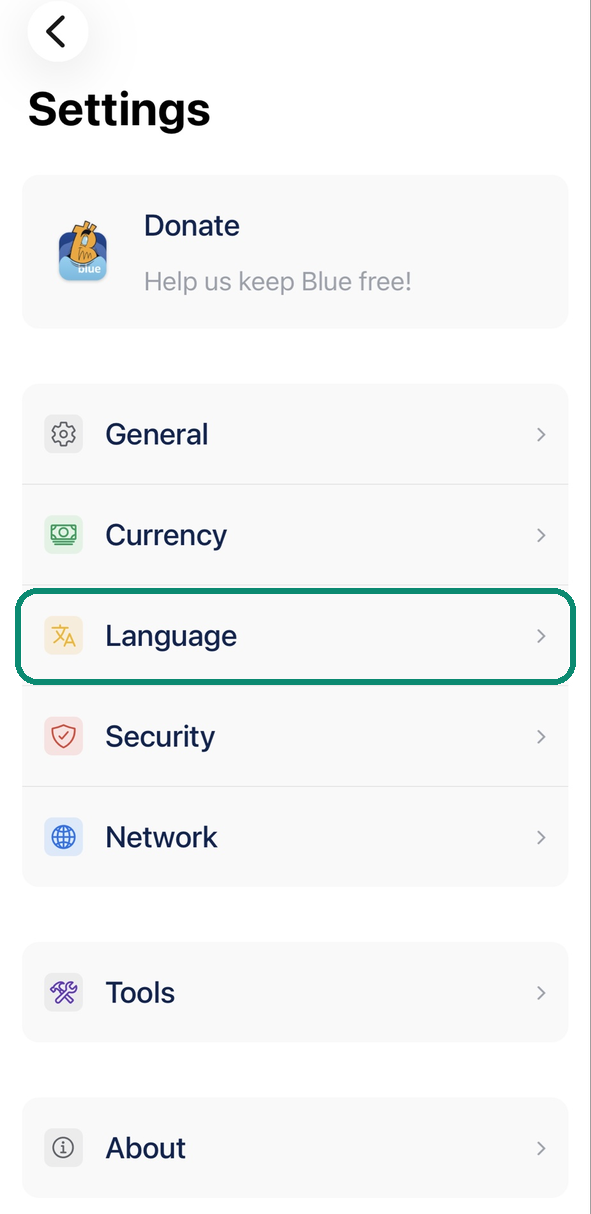
  2. Tap Settings, then the Language row.
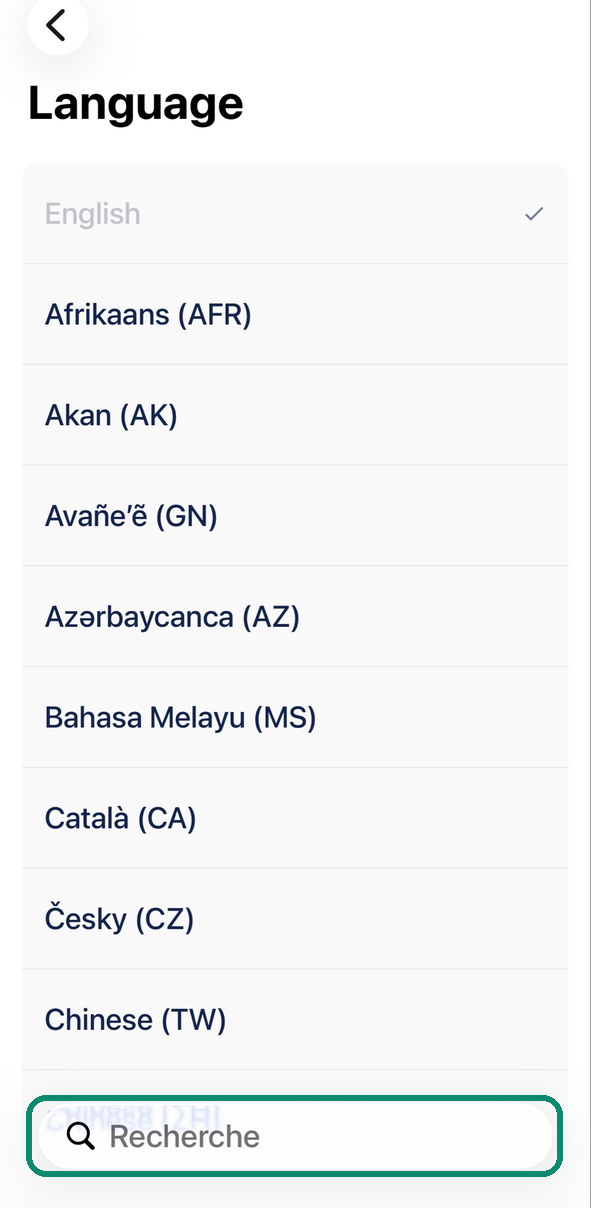
  3. Choose your language in the list.
  4. Close Blue Wallet completely, then reopen it: it is now in your language.
Blue Wallet home screen, the three dots at the top right framed
1. The three dots …, at the top right of the home screen.
Blue Wallet Settings screen, the Language row framed
2. In Settings, the Language row.
Blue Wallet Language list, the search field framed
3. The list of languages: scroll down, or type yours in the search field.

Bull, for its part, follows the phone's language on its own.

1. Tap Add now, or the + at the top right.

2. In Name, write a name for the wallet, not your own name: for example My wallet.

3. Choose the Bitcoin type, not Lightning or Vault, then tap Create.

4. A list of words appears. Copy them by hand, on paper, in order. They are the only way to recover your bitcoin if you lose your phone: no photo, no screenshot.

C4

Send your bitcoin to Blue Wallet

The one receiving gives an address, the one sending copies it. Here, Blue Wallet receives and Revolut sends.

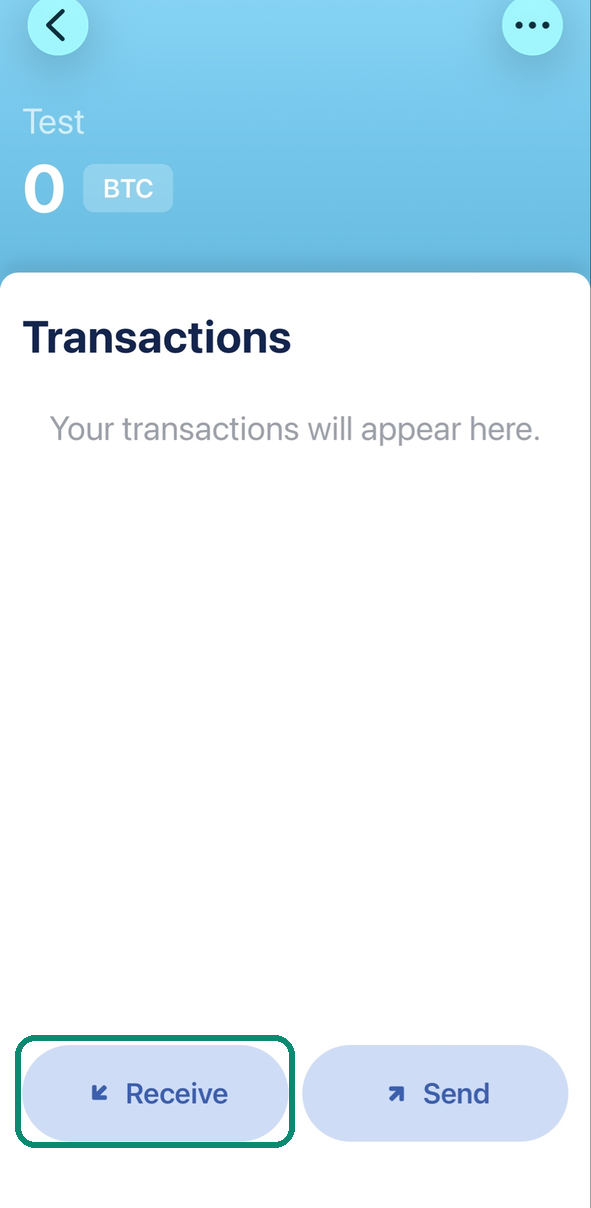
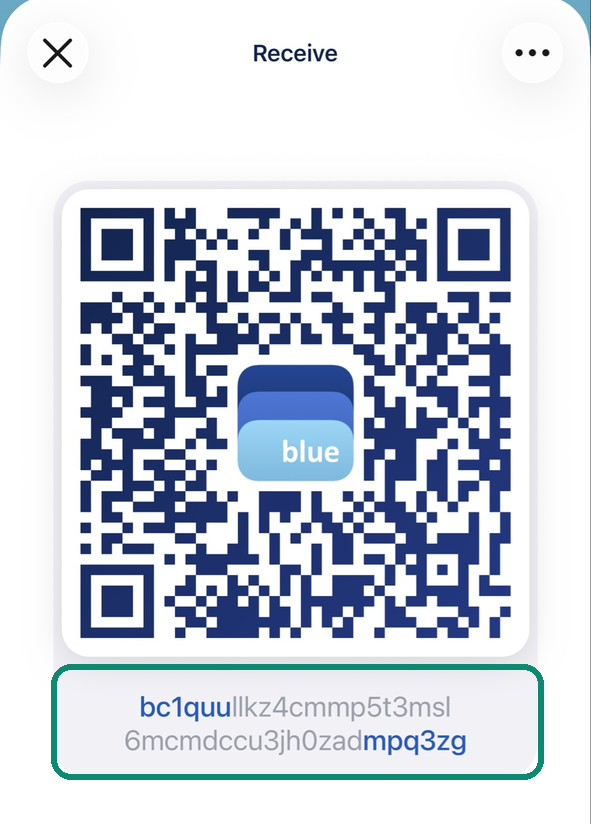
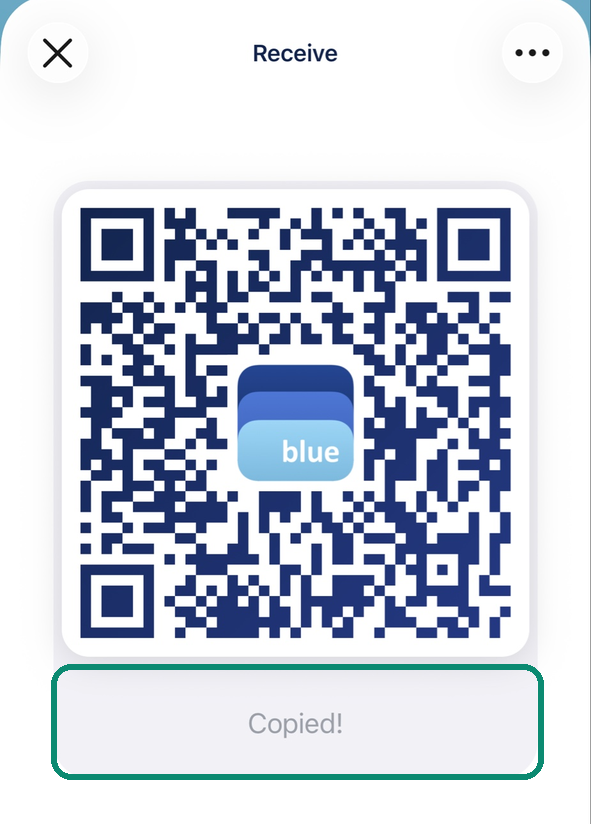
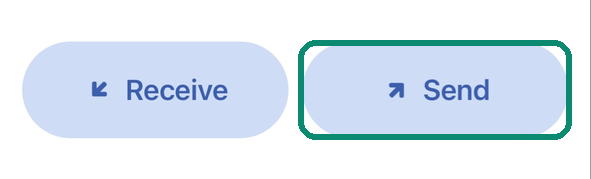
1. In Blue Wallet, tap Receive, then tap the address under the QR code: Copied! appears in its place, it is copied. Don't use your phone's share button, it sends nothing.

Blue Wallet wallet screen, the Receive button framed
1. In your wallet, Receive.
Blue Wallet Receive screen, the address under the QR code framed
2. Tap the address under the QR code.
Blue Wallet Receive screen showing Copied! in place of the address
3. Copied! replaces it: the address is copied.

Screenshots in English: in your app, the same buttons carry the names given in the text.

2. Leave Blue Wallet and open Revolut yourself: Bitcoin, then Send. Choose an external address, paste, and pick the Bitcoin network. If Revolut asks who the wallet belongs to, answer that it's yours.

3. Send a few euros first and wait for them to appear in Blue Wallet, first as pending. Then send the rest, all of it: about €90.

Has your bitcoin arrived in Blue Wallet? Order COVE now: it's the next step that opens your access.

Order COVE →
C5

Get COVE and pay in bitcoin

We only ask for an email address, preferably a confidential one, from Proton Mail for example. No name, no card, no automatic debit: you pay for a period of time, and it stops on its own if you don't renew it.

Payment is made in bitcoin, from your wallet, by copying the address we display or scanning the QR code. The amount in euros is converted at the day's rate right before your eyes, and your order is unlocked as soon as the network has confirmed it.

The order button below opens COVE with the duration you chose at the start.

Paying from Blue Wallet: copy the address, then the amount

  1. On the payment page, copy the address first. Touching the address is not enough: tap the small copy icon just next to it.
    NodeCove payment page, the small copy icon next to the address framed
    The small icon next to the address copies it.
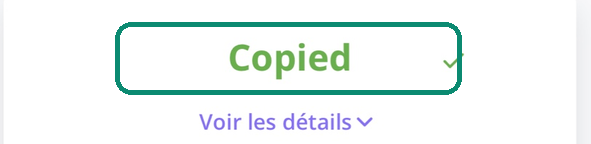
    NodeCove payment page, the copy icon turned into a tick
    It turns into a tick: the address is copied.
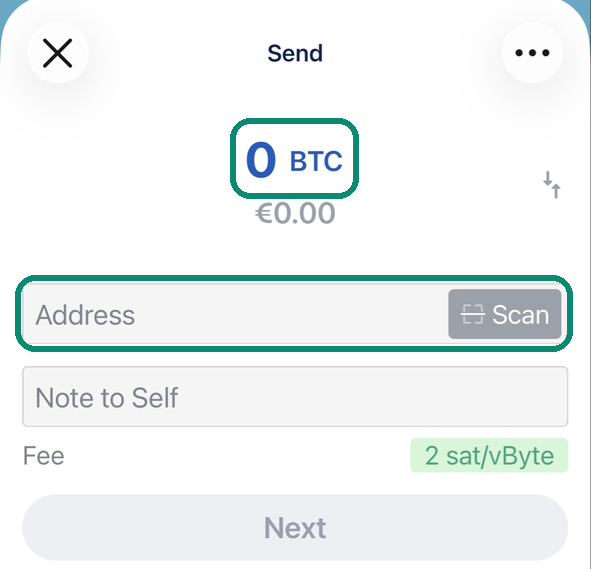
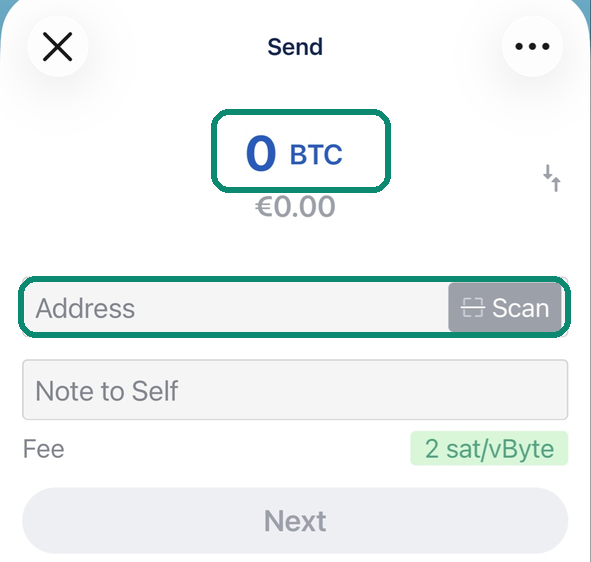
  2. Open Blue Wallet, tap Send, and paste the address into the Address field.
    Blue Wallet Send screen, the amount and the Address field framed
    The Send screen: the amount at the top, the Address field below.
  3. Go back to the payment page and tap the amount in BTC: it copies with a single tap, even though nothing suggests it.
    NodeCove payment page, Copied shown in place of the amount
    Tap the amount: Copied replaces it for a moment.
  4. In Blue Wallet, tap the amount 0 BTC at the top of the screen, paste, then Next, and confirm.

Is the payment page open on another screen? Tap Scan in Blue Wallet and aim at the QR code: the address and the amount are filled in at once.

C6

Choose your city, your PO box on the network

When you order, we measure the response time of each city from where you are, and we check the fastest one for you. You can choose another one: each city is shown with its country and jurisdiction, without dressing it up.

This choice isn't final. From your account, you can change cities whenever you want, as many times as you want, at no extra cost.

C7

Get the delivery email, and keep it

As soon as the Bitcoin network has confirmed your payment, an email arrives. It contains everything you need to open your first VPN tunnel: where to download the AmneziaWG app, your configuration, the QR code, and the link to your account.

Keep this email. If you lose it, request a new link from the access page using the same email address: we have nothing else to recognize you by.

This link will only open your account once your tunnel is active: that's the next step. Until then, the page will ask you to connect to the VPN first.

C8

Install AmneziaWG and open the tunnel

Your first tunnel is already ready. We created it at the moment of payment, for the city you chose, and its configuration travels in the delivery email. So you have nothing to do in your account to get started, which is just as well, since that account won't open until the tunnel is active.

Install AmneziaWG, the app that opens the tunnel: it exists for iPhone, Android, Mac, and Windows. On Linux, the tunnel opens from the command line. On a computer, you import the file attached to the delivery email; on a phone, you open that same file from the app, or you display the QR code from your account on another screen, and scan it. You tap the button, and it's active.

One tunnel per device, and ten devices at once with COVE. The next ones open from your account, once the first is active: you name the device, “iPhone at home”, “laptop at the office”, and we prepare a configuration for it alone. A tunnel only opens on the device it was created for: if you lose one, you delete its tunnel and no one can use it anymore.

C9

Come back to your account, with the tunnel open

Once the tunnel is active, go back to your account: a green banner confirms that you're indeed going through NodeCove. As long as the tunnel is closed, the account won't open and asks you to reconnect first. This is intentional, since your account can only be reached through our VPN, with a tunnel open.

What you'll find there, in order:

  • My subscription. Your plan, the expiry date, and a way to extend it without waiting for the last day. Time you buy is added to what remains.
  • My usage. This month's volume against your quota, so you're never caught by surprise.
  • My VPN tunnels. One per device: its name, its city, the day it was created. This is where you open one more, delete one, or change cities.
  • Login sessions. The browsers open on your account. Closing one doesn't close your tunnel: these are two different things.
  • Access via Tor. The backup address for your account, useful if our domain is blocked where you are.
  • The announcements channel, and referrals. The channel gives notice of an outage or a new city; referrals earn you free months when someone subscribes with your link.

A Switch to NODECOVE card is waiting there too. If you decide later to add your Bitcoin node, pick this manual back up at step 3: everything you've just done stays valid.

Seventeen glass tiles in a staircase, the first ones lit, the following ones still dark

Full path · NODECOVE

Seventeen steps,
in order, with no jargon.

You don't need to know anything before you start. Each step fits in a few lines, says what you need to touch on your phone and/or your computer, and why. Count on a little under an hour in all, half of it spent waiting for confirmations that don't depend on you.

Check off the steps as you go: your progress stays on this device, no one else sees it. The “details” links open in another tab or another page on your phone, so you never lose your place here.

0 / 17 steps checked

First part · Why

Two ideas to keep in mind, then we move on to practice.

You can skip these two pages and start at step 3. But the rest sticks a lot better once you know what it's for.

A violet glass tube passes through a curtain of light bars without being interrupted
01

A VPN that keeps no trace, and that gets through everywhere

There's a growing effort to find out what you do on the Internet. Your internet provider sees every site you open. The network at the hotel, the café, or the airport sees the same thing, and it isn't always run by honest people.

A VPN is a tunnel: what you do goes in encrypted and comes back out through another city, which hides the address of your home, known to your internet provider. The network around you no longer sees anything but an unreadable stream. Two things make the difference between our VPN and most others.

  • We don't log any history of what you do online. We can't hand over what we never wrote down, not to an authority, not to a hacker who broke into our systems.
  • Our tunnel doesn't look like a tunnel. Networks that block VPNs look for a recognizable signature. Stealth mode doesn't show one: it keeps getting through where others are cut off, including in the countries that filter the most, such as China, Russia, or Iran.

And since data leaks keep multiplying, helped along by increasingly effective AI, the sensible habit is simple: as soon as you're away from home, use our VPN. We install it for you on your phone, your tablet, and your computer, Mac as well as PC.

02

Bitcoin, and why it isn't enough on its own

An ordinary electronic payment leaves a line with your name on it, at your bank and at the merchant. Central bank digital currencies, today under study or in trial in about a hundred countries, are designed to be programmable: the rule travels with the money. That's not an accusation, it's the technical promise being made, and it's useful for fighting fraud. But it assumes that whoever writes the rule is always well intentioned, and no technology can guarantee that.

Bitcoin is the other end of the spectrum: the rule sits in the protocol, not at a counter. No one can issue more of it. Of the 21 million that will ever exist, about 20.1 million are already issued, close to 96% (circulating supply report), leaving fewer than 0.9 million left to produce, spread over more than a century. Set against the planet's 8.3 billion inhabitants (Worldometer), that comes to 0.0025 bitcoin per person, about 250,000 satoshis. In other words: eventually, very few people will hold a whole bitcoin. And above all, no one will be able to run the printing press.

Now the bad news, the part rarely mentioned. Bitcoin is not anonymous, it's pseudonymous. That means every transaction is recorded in a public, permanent ledger, known as the BlockChain. Even though your name isn't on each transaction, just a code, hence the word pseudonymous, the day you buy bitcoin through a bank or a platform that verifies your identity, all your past and future transactions, each carrying a different code, will be linked to you unless you manage to break that link.

In other words: used the way almost every beginner uses it, bitcoin follows you wherever you go. That's where we come in. NodeCove gives you the method and the means so that your bitcoin stops being automatically traceable by just anyone.

Second part · Getting bitcoin

Buy, then move it off the platform.

Three steps, about twenty minutes of your time. Verifying your account, though, can take a few hours.

A smooth coin comes out of a counter slot and rolls into the darkness
03

If you don't have any bitcoin: install Revolut

Before buying: how much? Choose your plan, and the guide works out the amount to buy.

Buy about €160 of bitcoin.

The margin covers the withdrawal fee, the network fee and the price moving between your purchase and your payment. Whatever is left stays yours, in Blue Wallet.

Revolut is an online bank, licensed in Europe, whose app installs in a few minutes. The account is free, and the euros you deposit are covered by the European bank deposit guarantee, up to €100,000 per account: you can open the account with confidence. Once your identity is verified with them, you buy bitcoin with one tap. Follow their step-by-step process, it's made for beginners.

Open the Revolut site ↗

However, don't leave your bitcoin with them. That €100,000 guarantee protects your euros, not your cryptocurrencies: Revolut states this in black and white. Bitcoin sitting in a Revolut account is covered by nothing, and above all: you don't hold the keys to it. It isn't your bitcoin, it's a promise of bitcoin.

Revolut is an entry counter, not a vault. Buy, then move it out right away, which is exactly what step 5 does.

If Revolut doesn't exist in your country, or if you'd rather not go through a bank, don't get stuck here: our dedicated page lists the recommended platforms region by region, Europe, the Americas, Asia, Africa, and the only question that matters when choosing one: will it really let you send your bitcoin out to your own wallet?

04

Install Blue Wallet: your declared wallet

A wallet is like a safe for your bitcoin, and you alone hold the keys to receive bitcoin or send it elsewhere. If you leave your bitcoin at Revolut, you don't really own it: you remain at the mercy of your banker's goodwill to make bitcoin transactions, not to mention that an administration can ask Revolut to freeze your bitcoin account at any time, which is impossible if you manage your own wallet. The wallet we recommend is Blue Wallet: free, available in your language, and it works on both iPhone and Android.

This one will be your declared wallet: the only one in contact with Revolut. It's the one that receives your purchases. It accepts being linked to your name, and that's just fine, it will be the only wallet linked to an institution that has asked for your identity. It will always act as a buffer between the institutions that seek to control you and your private wallet.

Don't have a phone handy, or would you rather work on a computer? Blue Wallet also exists for Mac. On Windows or Linux, use Sparrow or Electrum instead: also free, they're the two most widely used computer wallets, and they connect to your node exactly like the others do in step 10. The path doesn't change, only the screens do.

First: put Blue Wallet in your language

Blue Wallet often opens in English, even on a phone set to another language. Changing it takes thirty seconds.

  1. On the Blue Wallet home screen, tap the three dots … at the top right.
  2. Tap Settings, then the Language row.
  3. Choose your language in the list.
  4. Close Blue Wallet completely, then reopen it: it is now in your language.
Blue Wallet home screen, the three dots at the top right framed
1. The three dots …, at the top right of the home screen.
Blue Wallet Settings screen, the Language row framed
2. In Settings, the Language row.
Blue Wallet Language list, the search field framed
3. The list of languages: scroll down, or type yours in the search field.

Bull, for its part, follows the phone's language on its own.

During installation, the app shows you a list of words to copy down. Copy them by hand, on paper, in order. These words are your unique code to recover your wallet and everything it holds in bitcoin if you lose your phone. Without them, or if they're stolen from you, your bitcoin will be permanently lost. So take the importance of this backup seriously: no photo, no screenshot, no message to yourself.

05

Send your bitcoin to Blue Wallet

The principle is always the same, whatever the wallet: the one receiving gives an address, the one sending copies it. An address is a long string of letters and numbers. You never type it by hand: you copy it, or scan the QR code shown on screen with the app that's sending the funds, here Revolut.

How much to send? Everything you bought in step 3, about €160, in two goes: a few euros first, then the rest.

Blue Wallet only displays your address. Tap the address under the QR code: Copied! appears, it is copied. Then leave Blue Wallet and open Revolut yourself. Don't use your phone's share button: it sends nothing.

Blue Wallet wallet screen, the Receive button framed
1. In your wallet, Receive.
Blue Wallet Receive screen, the address under the QR code framed
2. Tap the address under the QR code.
Blue Wallet Receive screen showing Copied! in place of the address
3. Copied! replaces it: the address is copied.
Your online bank
Bitcoin · Send
Paste the address…
Amount
€50.00
Send
4. In Revolut, go to Bitcoin, then Send. Paste the address, enter the amount, confirm.
Your wallet
Received · pending
+ 0,000 51 ₿
1 confirmation…
5. The amount appears in Blue Wallet within a few minutes, first “pending”, then confirmed.

Make a tiny first transfer, the equivalent of a few euros, and wait for it to arrive before sending the rest. It's the only way to check that you haven't got the wrong address: a bitcoin transfer is final, no one can reverse it, not even us.

The diagrams on this page reproduce the layout of the screens, not their exact appearance: apps change often, the gestures don't.

Has your bitcoin arrived in Blue Wallet? Place your order now: it's the next step that opens your access.

Order NODECOVE →

Third part · Connecting NodeCove

The tunnel, then the node. This is where everything changes.

Eight steps. This is the heart of the method, and it's the part NODECOVE spares you: doing it yourself takes several weekends and a few thousand euros of hardware. Here everything is already installed, and all you need to do is copy an address into your wallets.

A glowing heart under a glass dome, its filaments stopping at the base
06

Get NODECOVE, for one year or two

NODECOVE is your private Bitcoin node and your stealth VPN. It's the plan you need: without the node, steps 10 and 12 don't exist, and that's exactly where the privacy of your bitcoin is decided.

We only ask for an email address, preferably a confidential one, from Proton Mail for example. No name, no card, no automatic debit.

Payment is made in bitcoin, from Blue Wallet, by copying the address we display or scanning the QR code. The amount in euros is converted at the day's rate right before your eyes, and your order is unlocked as soon as the network has confirmed it.

Paying from Blue Wallet: copy the address, then the amount

  1. On the payment page, copy the address first. Touching the address is not enough: tap the small copy icon just next to it.
    NodeCove payment page, the small copy icon next to the address framed
    The small icon next to the address copies it.
    NodeCove payment page, the copy icon turned into a tick
    It turns into a tick: the address is copied.
  2. Open Blue Wallet, tap Send, and paste the address into the Address field.
    Blue Wallet Send screen, the amount and the Address field framed
    The Send screen: the amount at the top, the Address field below.
  3. Go back to the payment page and tap the amount in BTC: it copies with a single tap, even though nothing suggests it.
    NodeCove payment page, Copied shown in place of the amount
    Tap the amount: Copied replaces it for a moment.
  4. In Blue Wallet, tap the amount 0 BTC at the top of the screen, paste, then Next, and confirm.

Is the payment page open on another screen? Tap Scan in Blue Wallet and aim at the QR code: the address and the amount are filled in at once.

Just know that this payment leaves a visible line in the public ledger between your declared wallet and us. Buying a VPN isn't a crime, and it reveals nothing about what you do with it: it's the declared wallet's job, Blue Wallet, to carry the traces that link you to a bank or an institution that knows your identity. That way your private wallet, which we'll install next, has no more direct link to those institutions.

07

The email arrives: install the tunnel app

As soon as your payment is confirmed, you receive an email. It contains three things: where to download the AmneziaWG app, your configuration file, and a QR code to scan if you'd rather.

Keep this email. You'll need it if you change phones, to open our VPN's tunnel again.

AmneziaWG is the app that opens the tunnel. It exists for iPhone, Android, Mac, Windows, and Linux. You install it, import the file you received, and that's it, there's nothing to configure.

08

Open the tunnel: a single switch

In AmneziaWG, a single button. You turn it on: you're in the tunnel. You turn it off: you're out of it. To check, go back to our homepage, the shield at the top of the page turns green and shows “Protected by NodeCove”.

This tunnel isn't just a convenience. It's mandatory to use your private Bitcoin node, in steps 10 and 12: your node can only be reached from inside the tunnel. That's what makes it yours and not everyone else's.

09

Enter your account: other devices, other cities

With the tunnel open, go to “My account”. There you'll find your tunnels already open, your usage, and a way to open other tunnels: one per device, and as many cities as you want.

One tunnel per device, that's the rule: phone, computer, the household tablet. Some services on the Internet are blocked or restricted depending on which region of the world you're in: our stealth VPN lets you get around these restrictions by opening a tunnel to the city of your choice. The service in question will then think you're located in that city, and open up to you.

10

Connect Blue Wallet to your private node

This is the most important step on the whole page.

Here's what every wallet does today, and that no one has told you. Every time you open your wallet to check your balance, to receive bitcoin, or to send it elsewhere, it asks a server on the Internet for your balance, often run by an authority, sometimes by a hacker. To be able to give you that balance, your wallet has to hand it the list of all your bitcoin accounts attached to that wallet. Without doing anything illegal, that server therefore learns that these addresses are yours, and it sees the Internet address you're asking from: that's how it can go check the great ledger known as the blockchain, and tell you that you do indeed own your bitcoin. This is true for almost everyone who holds bitcoin.

By connecting your wallet to your own node, this question never goes out to a stranger again. It travels through the tunnel and stops at your place. No one learns anything more about the bitcoin you hold.

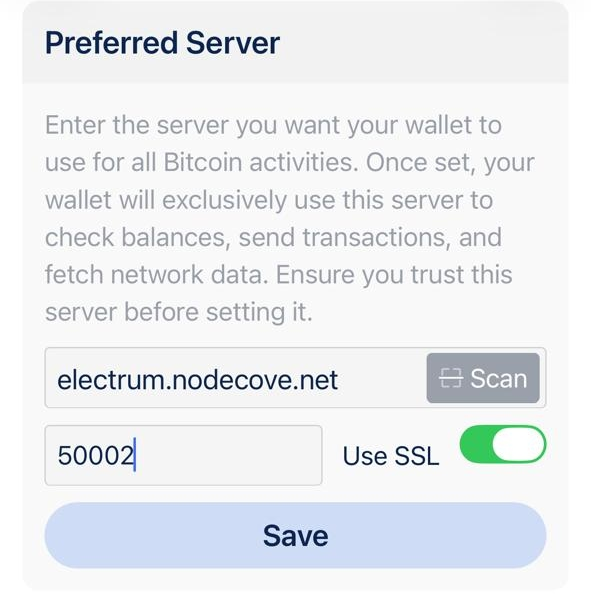
Your node's address isn't a secret: electrum.nodecove.net, port 50002. But only NODECOVE tunnels can reach it, and nothing you ask it is ever written down on our end.

Blue Wallet home screen, the three dots at the top right framed
1. On the home screen, the three dots … at the top right.
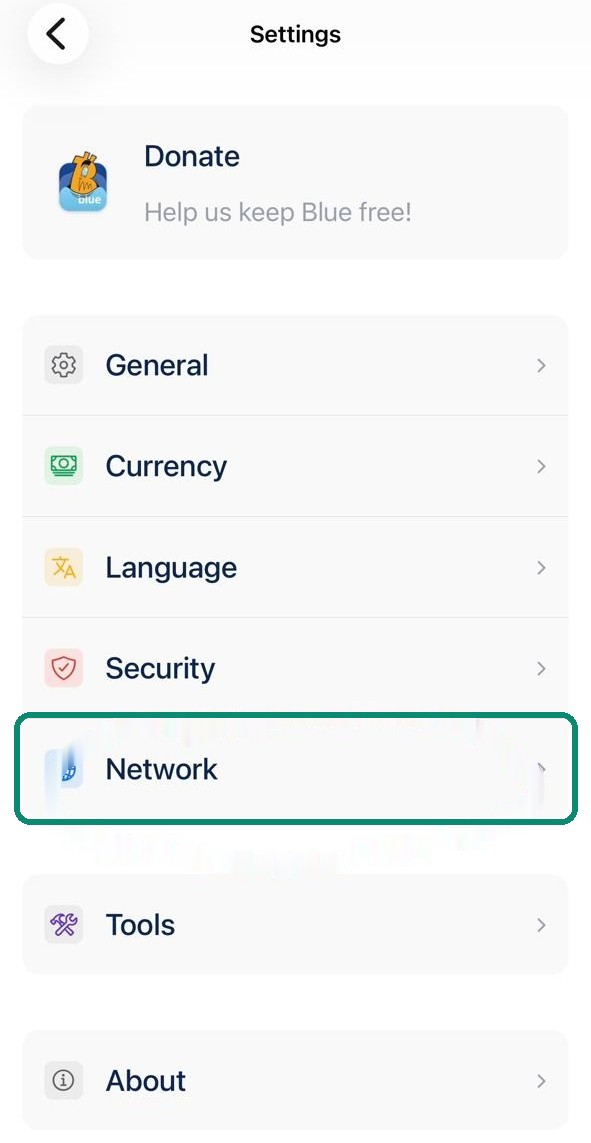
Blue Wallet Settings screen, the Network line highlighted
2. In Settings, the Network line.
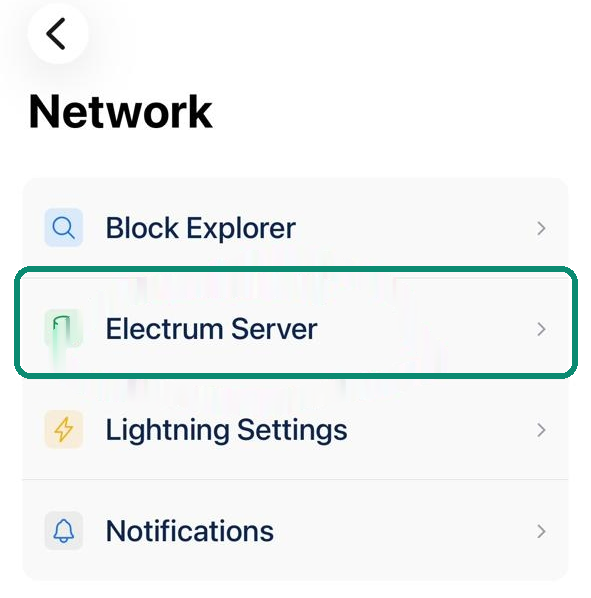
Blue Wallet Network screen, the Electrum Server line highlighted
3. In Network, the Electrum Server line.
Blue Wallet Preferred Server screen with electrum.nodecove.net, port 50002, and Use SSL turned on
4. In Preferred Server: electrum.nodecove.net in the first field, 50002 in the second, Use SSL turned on, then Save. Close and reopen the app.
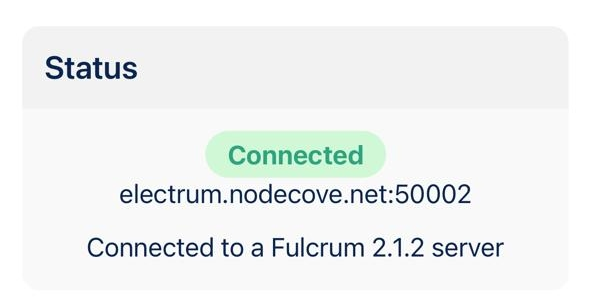
Blue Wallet Status block showing Connected on electrum.nodecove.net port 50002
5. The Status block shows Connected: that's your node answering, and no longer an unknown server.

Screenshots taken in Blue Wallet on iPhone. The green frame marks the line to tap: it isn't part of the app.

On a computer, it's the same setting under a different name: in Sparrow, the Configure Server button then Private Electrum; in Electrum, the Network menu. You enter the same address and the same number there: electrum.nodecove.net and 50002.

Two practical consequences. The tunnel must be open for the wallet to show your balance; if it stays stuck, it's almost always because the tunnel is closed. And the day you leave NodeCove, just restore the original setting.

What this step doesn't do: it doesn't erase anything from the public ledger. Transactions already recorded stay there, with us as with anyone else. What it removes is the ongoing leak that linked your addresses to you, every day, without your knowledge.

11

Install Bull Wallet: your reserved wallet

A second wallet, a second role. Bull Wallet will be your reserved wallet: the one holding your reserve, the one that never talks to Revolut, never to a platform that knows your name.

Why two apps instead of two accounts in the same one? Because the separation has to be physical, not just for show: two apps, two word lists, no possible mix-up when it's time to send.

Bull Wallet only exists on phone, iPhone and Android. If you do everything on a computer, use Electrum for this second wallet if you've already installed Sparrow, or Sparrow if you started with Electrum. The goal is to have two word lists in two different apps, so the separation stays complete.

As in step 4: copy the word list down on paper, in order, and store it somewhere other than the first one.

12

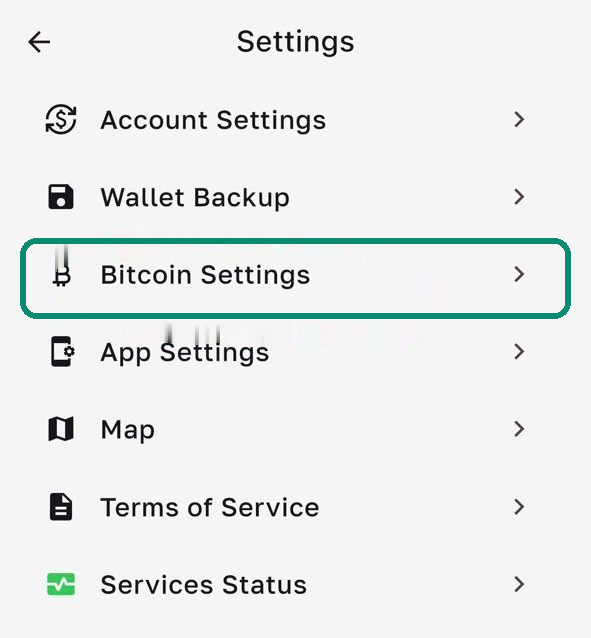
Connect Bull Wallet to the same node

The exact same action as in step 10, in a different app. And here it matters even more: this is your reserve wallet, the one whose address list you especially don't want ending up with a stranger.

Bull Wallet Settings screen, the Bitcoin Settings line highlighted
1. The gear icon in the top right opens Settings. Take Bitcoin Settings.
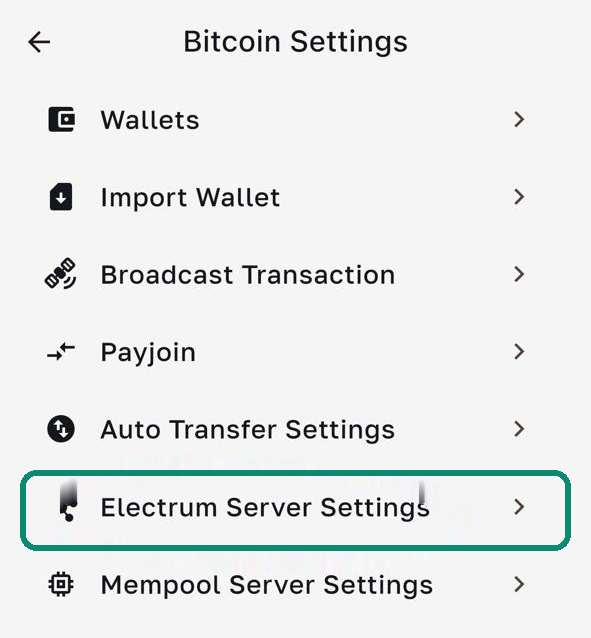
Bull Wallet Bitcoin Settings screen, the Electrum Server Settings line highlighted
2. Then Electrum Server Settings.
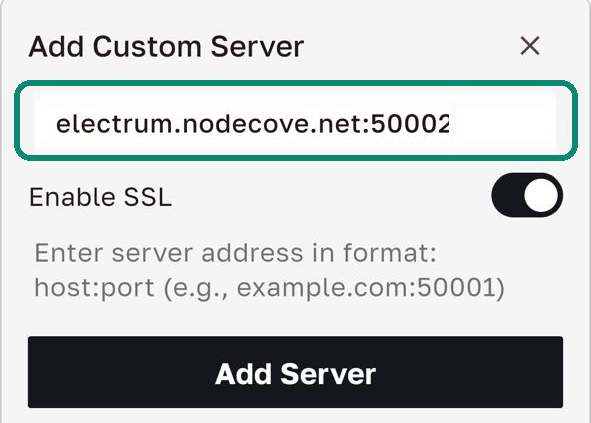
Bull Wallet Add Custom Server window with electrum.nodecove.net:50002 and Enable SSL turned on
3. Right at the bottom, Add Custom Server. A single field here: electrum.nodecove.net:50002, the host and the number joined by a colon. Turn on Enable SSL, then Add Server.
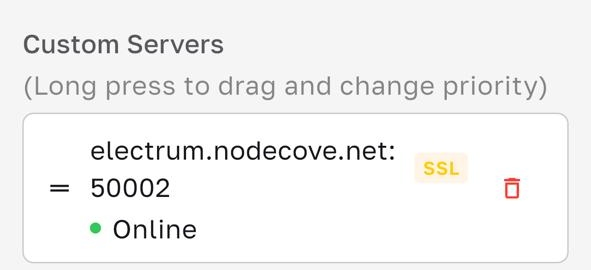
Bull Wallet Custom Servers list showing electrum.nodecove.net:50002 as SSL and Online
4. Yours appears under Custom Servers, with a green Online dot. The default servers switch to Not Used: Bull no longer queries them.

Screenshots taken in Bull Wallet on iPhone. Don't add https:// or the :s suffix: in this version, it's the Enable SSL switch that encrypts the connection. The tunnel must be open.

13

Move part of your bitcoin over to Bull

The same action as in step 5, between your two apps: Bull gives an address, Blue sends to it.

In Bull: copy your address

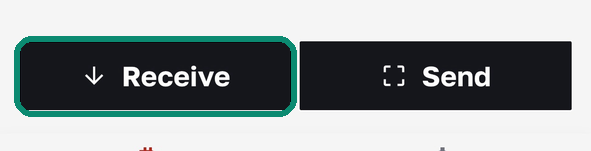
  1. In Bull, tap Receive.
    Bull Wallet, the Receive button framed
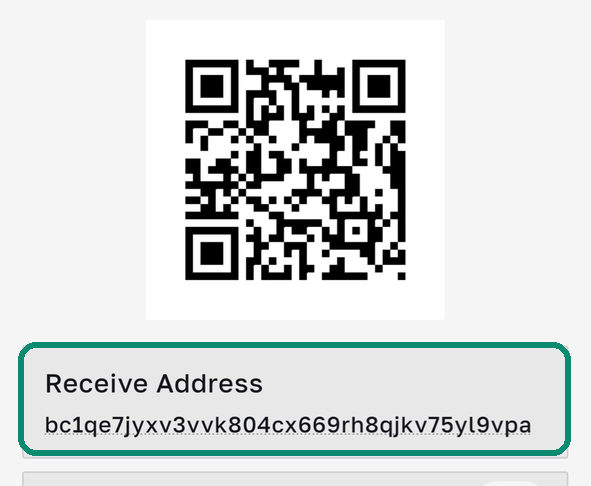
  2. Under the QR code, tap the Receive Address box.
    Bull Wallet Receive screen, the Receive Address box framed
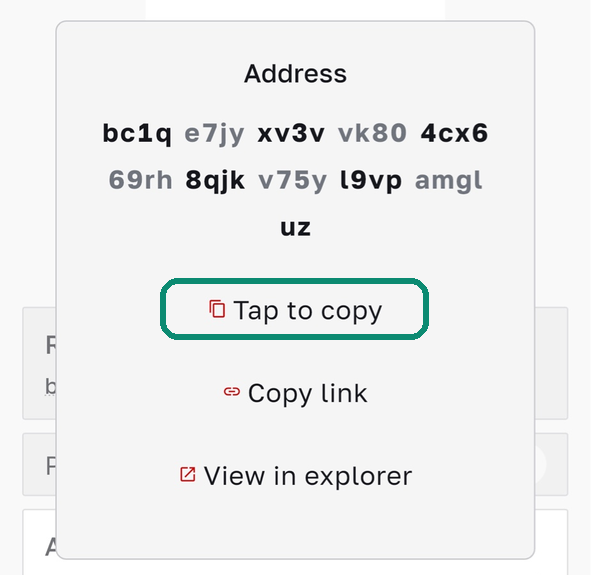
  3. In the window that opens, tap Tap to copy.
    Bull Wallet address window, Tap to copy framed
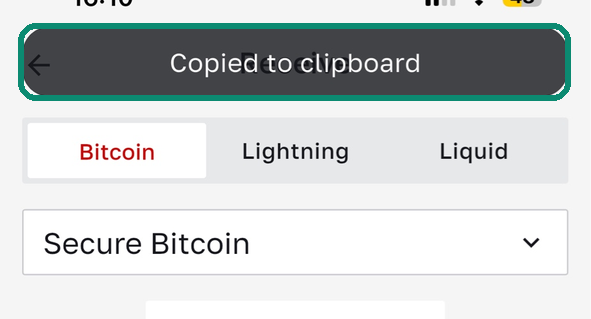
  4. Copied to clipboard appears at the top of the screen: the address is copied.
    Bull Wallet Receive screen, the Copied to clipboard message framed

In Blue Wallet: send part of it

  1. Open Blue Wallet and tap Send.
    Blue Wallet wallet screen, the Send button framed
  2. Paste the address into the Address field. Tap 0 BTC and enter an amount that doesn't resemble any other, then Next, and confirm.
    Blue Wallet Send screen, the amount and the Address field framed

Your reserve is in place, and its balance has only ever been asked of your node.

The golden rule: never send everything, and never the exact amount you just received. Send part of it, with an amount that doesn't resemble any other, and not on the same day. It's this partial amount that does all the work: a wallet emptied all at once to a single recipient can only look like a move to yourself, whereas a partial transfer of an arbitrary amount looks exactly like a payment made to someone else.

Why it's the node that makes this solid. The transaction itself stays recorded in the public ledger: an observer can see it. What they can no longer do is confirm it. Without your node, your wallet used to ask an unknown server for its balance every day, handing it the list of its addresses: that list was enough to prove the two wallets belonged to you. That leak no longer exists.

The result: all that's left for them is suspicion, never proof. And a suspicion about a partial transfer of an ordinary amount isn't worth much, since that transfer looks just like an everyday payment. That's why you never transfer the whole amount.

Fourth part · Spending

Get it back out without going through the counter again.

Keeping a discreet reserve is pointless if spending it brings you straight back to the platform that knows your name. Four steps to avoid that.

A payment card with no name or number, lit from the edge
14

Take stock: what you've achieved

At this point, without having become a technician: your browsing no longer goes through anyone else's network; your two wallets no longer ask unknown servers for anything; your reserve is separate from your bank account; and no one at our end knows who you are.

What's left is the part most people overlook, and which ruins everything else: how to get this money back out. If your only way out is the platform that knows your name, most of the precaution is wasted.

A word about the day you leave. This silence is kept by our node. If you cancel your subscription, you'll need to put your wallets back on a public server, and they'll immediately hand it the list of their addresses: the privacy gained here is then lost, the past included, Bull first of all. As long as our node stays set, they tell no one anything: at worst, without an open tunnel, they simply stop showing the balance, without you losing anything.

15

The rule you must never break

From Bull, your reserved wallet, you can pay a person, a craftsperson, a shopkeeper who accepts bitcoin. That's what it's for.

But never, ever, to a platform where you've given your identity. The day you do, you hand it the link between your name and your reserve yourself, and everything in Bull becomes readable, the past included.

If you need to bring your bitcoin back to Revolut, to another bank, or to a platform that handles cryptocurrencies, never do it directly from Bull. Go the other way: from Bull to Blue Wallet, from your reserved wallet to your declared wallet, always in split amounts, and only then from Blue Wallet to Revolut. But normally you won't have to do this: the next step teaches you how to cash out your bitcoin with more discretion.

A way not to get it wrong: the color. Blue Wallet is blue, Bull Wallet is red. The red is there to warn you: that wallet must never be connected to an institution that knows your identity. The blue one is the one that receives, the red one is the one that keeps.

16

The Freedomia Visa card, with no name on it

Freedomia issues a virtual Visa card that's topped up in bitcoin, with no identity check. You open an account with an email address, you receive a personal top-up address, you send bitcoin to it, just as you did between your two wallets: Freedomia gives you an address that you copy into Bull to send the amount you want. The amount is converted to dollars at the day's rate and credits the card right away. You spend anywhere Visa is accepted.

What this solves: you spend your bitcoin without routing it back through a platform that knows you.

From which of your wallets? From Bull, your reserved wallet. This may seem to contradict step 15, but Freedomia doesn't know your name, whereas a top-up sent from a platform that has asked for your papers would be linked to your identity in a second.

That said, Freedomia does see the addresses the money comes from, and those addresses could resurface one day, through a hack or a legal order. This is where the work of steps 10 to 13 pays off: those addresses belong to your reserved wallet, whose list no server has ever received, and which has never received anything from a platform that knows you. What can be drawn from that is a guess, not a certainty.

What we owe you before you click. Common usage sits around $5,000 a month: it's a threshold, not a guarantee. The issuer's terms state that beyond it, an identity check may be required. Expect about 1.3% in fees on each top-up, plus a monthly subscription.

The bitcoin you transfer to Freedomia becomes a balance held by a third party, which sees all of your purchases linked together, and whose terms allow it to block its Freedomia card, so on the amount you transferred to them, but never on the bitcoin that stays with you in Bull. The Freedomia card is a pocket wallet, never a vault: only put in it what you're going to spend.

Open a Freedomia account

Affiliate link: NodeCove earns a commission at no extra cost to you. Freedomia is an independent service: we document it, we don't control it.

17

A detail that matters: the card wants an Android phone

To pay contactless with this card, you need Google Wallet, so an Android phone.

If you're attached to your iPhone, keep it, and get a cheap second Android phone for this purpose. No particular model is needed: a recent entry-level device, new or used, is more than enough to run Google Wallet. With several manufacturers, the interface actually looks a lot like Apple's, and you'll find your way around in a few minutes.

To use Google Wallet, you need a Google account. Create a separate Google account that will only be used for this phone and this card. Don't mix this account with the one that holds your emails, your photos, and your contacts: that would be gathering back together with one hand what you just separated with the other.

The questions we get asked here

Three terms not to leave unclear.

“Without identity verification”, what does that actually mean?

Financial services are required, in most countries, to verify who their customer is: an ID document, proof of address, sometimes a photo of your face. This is what's called customer identity verification. It's what Revolut does, and it's normal, it's a bank.

A service that doesn't do this asks you for nothing more than an email address. That doesn't put you outside the law: it's the service that decides its own framework, not you. But two consequences concern you. Your obligations remain your own, whatever you're required to declare, you still have to.

Why can we only pay you in bitcoin?

Because accepting a card means asking for a name, an address, and a bank, then keeping them. We sell exactly the opposite. A payment in bitcoin lets us know nothing about you, and therefore have nothing to hand over to anyone who might ask for it.

It's also the simplest consistency check there is: a service that promises you privacy while charging your bank card necessarily keeps your identity somewhere.

And if I get lost, or a step doesn't work?

Go back to the previous step, the one you checked off. The most common mistakes are always the same: the tunnel is closed when a step requires it, or the address was retyped by hand instead of copied.

Each step links to a detailed guide, screen by screen, that opens in another tab. And if you'd rather write to us, the announcements channel explains how to reach us without giving your name.

You now know why we only accept bitcoin.

We don't want to know anything about you. What we sell is expertise and a ready-to-use service, one that would cost you several thousand euros of hardware and quite a few weekends if you built it yourself.

The rest of the site is a wealth of information for anyone who wants to dig deeper into the issues ahead. Everyone sets the balance where they see fit between their peace of mind and their freedom, and no one is in a position to lecture them about it. We simply speak to those who'd rather keep that choice open: NodeCove exists for them.

Get NODECOVE

Back to home